I remember sitting in front of my bathroom mirror three years ago, sweating, with a piece of shredded waxed floss stuck firmly under my brand-new dental bridge. It felt like I was trying to thread a needle with a thick rope while wearing winter gloves. I’d just invested a significant amount of money and time into my smile, yet there I was, terrified that I’d accidentally pull the whole thing out just because of a stubborn piece of kale. My gums were throbbing, and I honestly felt like a failure at basic hygiene. If you’ve ever felt like your dental work is a fortress that no floss can penetrate, I want you to know I’ve been there, and there is a way through it that doesn’t involve a panic attack.
Your New Dental Work Isn’t Just for Show
When we get a bridge or an implant, we often focus on how great it looks in the mirror. But the reality of maintaining a healthy smile is that the architecture of your mouth has changed. A bridge isn’t like individual teeth; it’s a solid unit, and that means the old ‘up and down’ flossing method is officially retired. If you don’t clear out the debris, you’ll start to notice that your dental bridge feels loose during meals or, worse, your gums will start to scream at you. I’m going to show you exactly how to navigate these bulky spots using the ‘thread-and-pull’ technique that changed my life. We’re going to tackle the tightest gaps and ensure those innovative dental implants stay as clean as the day they were placed. Have you ever found yourself staring at a piece of floss, wondering if it’s even worth the struggle?
Does flossing around a bridge actually matter?
You might be skeptical. After all, if the teeth aren’t real, they can’t get cavities, right? That was my first big mistake. While the porcelain itself is immune to decay, the gum tissue and the ‘anchor’ teeth underneath are more vulnerable than ever. According to the American Academy of Periodontology, plaque buildup around restorations is a leading cause of implant failure, often due to peri-implantitis. I learned this the hard way when I tried to use a makeshift tool—and yes, I’m ashamed to admit it—I once considered using a safety pin to remove food. It was a dangerous mistake that could have scratched the post or caused an infection. Today, we are going to leave those risky habits behind and embrace tools that actually work for your specific anatomy, ensuring you never have to deal with that ‘stuck’ feeling again.
Ditch the Standard String for Specialized Tools
Standard floss is great for natural teeth, but for complex dental work, it is like trying to sweep a floor with a toothbrush—inefficient and frustrating. To keep your work pristine, you need a floss threader or specialized super-floss. Think of the threader as a flexible plastic needle. You loop your floss through the eye and then guide the stiff end into the gap between the gum and the bridge. I remember the first time I tried this; I was so nervous about tugging too hard that I barely touched the surface. The result? A week later, my gums were puffy. I realized that cosmetic dentistry secrets to boost your confidence are not just about the procedure, but the daily grit of maintenance. You have to be firm but gentle. 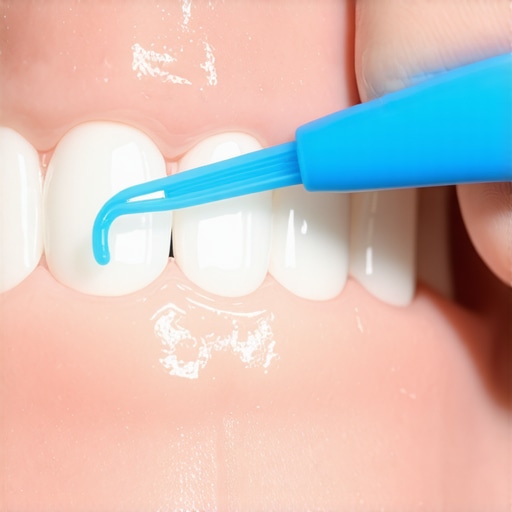
How to Slide Under the Bridge Without Causing Damage
Once the threader is through, you are not just moving it back and forth. You need to wrap the floss around the anchor teeth in a C-shape. This is crucial because plaque loves to hide at the gumline where the porcelain meets your natural tooth. If you skip this, you might eventually find that your dental bridge feels loose during meals because the supporting teeth are decaying. I once spent twenty minutes in a hotel bathroom trying to get the angle right after a steak dinner. I was frustrated and almost gave up, but then I remembered the C-shape trick. By hugging the tooth, I pulled out a piece of debris I did not even know was there. It is the difference between a surface clean and a deep-tissue detail.
Protect Your Implants from Scratches and Infection
If you are dealing with innovative dental implants, the rules change slightly. You must learn how to safely clean a dental implant without scratching the post. Metal scalers or abrasive floss can create microscopic grooves in the titanium, which become luxury hotels for bacteria. Instead, use a soft, woven floss or a specialized proxy brush. If you notice that your dental implant crown feels like it is wiggling, it is often a sign that the surrounding tissue is inflamed. I have found that using a water flosser on a low setting is a game-changer for those hard-to-reach posterior implants. It flushes out the biofilm—that slimy layer of bacteria—without any mechanical scraping.
Manage the Tight Gaps in Your Permanent Retainers
Many people who have had braces or veneers also have a permanent wire behind their teeth. This is a notorious trap for tartar. You need to apply the secret to flossing when you have a permanent wire retainer: vertical threading. Instead of going horizontally, you thread the floss from the top down, between the teeth, and under the wire. One morning, I was in such a rush I tried to force the floss through, and my gums immediately started throbbing. I had to learn why your gums feel sore after you floss for the first time in weeks the hard way—trauma from force is just as bad as neglect. Slow down, find the gap, and let the tool do the work.I remember sitting in front of my bathroom mirror three years ago, sweating, with a piece of shredded waxed floss stuck firmly under my brand-new dental bridge. It felt like I was trying to thread a needle with a thick rope while wearing winter gloves. I’d just invested a significant amount of money and time into my smile, yet there I was, terrified that I’d accidentally pull the whole thing out just because of a stubborn piece of kale. My gums were throbbing, and I honestly felt like a failure at basic hygiene. If you’ve ever felt like your dental work is a fortress that no floss can penetrate, I want you to know I’ve been there, and there is a way through it that doesn’t involve a panic attack.
Your New Dental Work Isn’t Just for Show
When we get a bridge or an implant, we often focus on how great it looks in the mirror. But the reality of maintaining a healthy smile is that the architecture of your mouth has changed. A bridge isn’t like individual teeth; it’s a solid unit, and that means the old ‘up and down’ flossing method is officially retired. If you don’t clear out the debris, you’ll start to notice that your dental bridge feels loose during meals or, worse, your gums will start to scream at you. I’m going to show you exactly how to navigate these bulky spots using the ‘thread-and-pull’ technique that changed my life. We’re going to tackle the tightest gaps and ensure those innovative dental implants stay as clean as the day they were placed. Have you ever found yourself staring at a piece of floss, wondering if it’s even worth the struggle?
Does flossing around a bridge actually matter?
You might be skeptical. After all, if the teeth aren’t real, they can’t get cavities, right? That was my first big mistake. While the porcelain itself is immune to decay, the gum tissue and the ‘anchor’ teeth underneath are more vulnerable than ever. According to the American Academy of Periodontology, plaque buildup around restorations is a leading cause of implant failure, often due to peri-implantitis. I learned this the hard way when I tried to use a makeshift tool—and yes, I’m ashamed to admit it—I once considered using a safety pin to remove food. It was a dangerous mistake that could have scratched the post or caused an infection. Today, we are going to leave those risky habits behind and embrace tools that actually work for your specific anatomy, ensuring you never have to deal with that ‘stuck’ feeling again.
Ditch the Standard String for Specialized Tools
Standard floss is great for natural teeth, but for complex dental work, it is like trying to sweep a floor with a toothbrush—inefficient and frustrating. To keep your work pristine, you need a floss threader or specialized super-floss. Think of the threader as a flexible plastic needle. You loop your floss through the eye and then guide the stiff end into the gap between the gum and the bridge. I remember the first time I tried this; I was so nervous about tugging too hard that I barely touched the surface. The result? A week later, my gums were puffy. I realized that cosmetic dentistry secrets to boost your confidence are not just about the procedure, but the daily grit of maintenance. You have to be firm but gentle. 
How to Slide Under the Bridge Without Causing Damage
Once the threader is through, you are not just moving it back and forth. You need to wrap the floss around the anchor teeth in a C-shape. This is crucial because plaque loves to hide at the gumline where the porcelain meets your natural tooth. If you skip this, you might eventually find that your dental bridge feels loose during meals because the supporting teeth are decaying. I once spent twenty minutes in a hotel bathroom trying to get the angle right after a steak dinner. I was frustrated and almost gave up, but then I remembered the C-shape trick. By hugging the tooth, I pulled out a piece of debris I did not even know was there. It is the difference between a surface clean and a deep-tissue detail.
Protect Your Implants from Scratches and Infection
If you are dealing with innovative dental implants, the rules change slightly. You must learn how to safely clean a dental implant without scratching the post. Metal scalers or abrasive floss can create microscopic grooves in the titanium, which become luxury hotels for bacteria. Instead, use a soft, woven floss or a specialized proxy brush. If you notice that your dental implant crown feels like it is wiggling, it is often a sign that the surrounding tissue is inflamed. I have found that using a water flosser on a low setting is a game-changer for those hard-to-reach posterior implants. It flushes out the biofilm—that slimy layer of bacteria—without any mechanical scraping.
Manage the Tight Gaps in Your Permanent Retainers
Many people who have had braces or veneers also have a permanent wire behind their teeth. This is a notorious trap for tartar. You need to apply the secret to flossing when you have a permanent wire retainer: vertical threading. Instead of going horizontally, you thread the floss from the top down, between the teeth, and under the wire. One morning, I was in such a rush I tried to force the floss through, and my gums immediately started throbbing. I had to learn why your gums feel sore after you floss for the first time in weeks the hard way—trauma from force is just as bad as neglect. Slow down, find the gap, and let the tool do the work.
Stop Chasing Perfection and Start Protecting the Seal
Here is the contrarian truth about cosmetic dentistry: many patients actually *over-clean* their restorations into an early grave. While you might think aggressive scrubbing is the way to keep those veneers looking their best, you are actually risking the marginal seal. This is the microscopic edge where your restoration meets your natural tooth. If you are too rough, you can cause the gum to recede, exposing a tiny ledge that traps bacteria. Most people assume their dental work is indestructible, but in my experience, the bond is only as strong as your gentle touch. If you’ve ever noticed that your veneers feel tight when you wake up in the morning, it might not just be clenching; it could be inflammation from aggressive cleaning.
Why does your breath still smell after cleaning your bridge?
This is a question I get all the time. You floss, you brush, yet there is a lingering odor. The hidden nuance here is biofilm maturation. A study published in the *Journal of Prosthetic Dentistry* highlights that restorations have different surface energies than natural enamel, which can actually encourage certain bacteria to colonize faster. If you aren’t using a technique that disrupts this biofilm—like the ‘C-shape’ wrap or a specialized interdental brush—you are just moving the slime around rather than removing it. Don’t fall for the mistake that makes porcelain veneers look like piano keys by over-polishing the front while ignoring the critical ‘hidden’ zones where the smell actually starts.
Avoid the Trap of Abrasive Aftercare
One of the biggest ‘oops’ factors I see is patients using whitening toothpastes on their new work. These pastes are often highly abrasive. For veneers or crowns, this acts like sandpaper, micro-scratching the glaze and making them more susceptible to stains. Instead of a brighter smile, you end up with a dull finish that absorbs red wine stains more easily. If you are worried about a shift, know how to handle a loose dental bridge at home by keeping it clean and stable, but never use household adhesives or abrasive cleaners. Have you ever fallen into this trap of being too ‘thorough’ and ended up with sore gums? Let me know in the comments. Keeping your dental implants and cosmetic work healthy is a marathon of finesse, not a sprint of force.
I used to think my sonic toothbrush was the endgame for oral health until I realized it was barely touching the gaps created by my dental bridge. Now, I swear by TePe Interdental Brushes. Unlike the flimsy ones you find at the grocery store, these have a plastic-coated wire specifically designed so they won’t spark or scratch your titanium posts. If you are serious about how to safely clean a dental implant without scratching the post, you need to look at the ‘size-to-gap’ ratio. I keep three different sizes in my drawer because the space between my molars is significantly wider than the space near my canines. Using the wrong size is like trying to wash a car with a Q-tip; you need the bristles to actually make light contact with both surfaces to disrupt the plaque.
Invest in Tools That Respect Your Restoration’s Seal
Another game-changer for me was switching to a water flosser with a specialized ‘Plaque Seeker’ tip. This isn’t just marketing fluff; it has three thin tufts of bristles that reach those stubborn areas around dental implants and their 2025 innovations. I’ve found that using it on the mid-pressure setting effectively flushes out the sulcus without detaching the delicate gingival seal. A 2019 review from the Cochrane Database of Systematic Reviews actually found that interdental brushes are often more effective than floss at reducing gingival inflammation in patients with bridge work. This clinical insight changed how I approach my nightly routine entirely.
#IMAGE_PLACE_HOLDER_D#
How do I maintain my dental work over time?
The secret isn’t just about what you do at home; it’s about the professional ‘check-and-tune’ appointments. Every six months, I ask my dentist to specifically check the torque on my implant abutment screws. Many people don’t realize that like any mechanical joint, these can experience ‘vibration loosening’ over years of chewing. By staying proactive with family dentistry tips for a lifetime of healthy smiles, you can catch these tiny shifts before they become costly failures. I also make sure to use the best way to clean your retainers so they dont smell because a bacteria-laden nightguard is just a petri dish for your new veneers, leading to inflammation that can compromise the gum line.
Future Implants Might Talk Directly to Your Phone
Looking ahead, I predict we are moving toward ‘Smart Implants.’ We are already seeing research into cutting-edge techniques in cosmetic dentistry that involve pH sensors embedded in the porcelain. Imagine getting a notification on your phone that the acidity levels around your bridge are too high, signaling a potential infection before you even feel pain. This kind of tech will transform maintenance from guesswork into data-driven health. For now, here is my advanced tip for you: Try dipping your interdental brush into a non-alcohol antimicrobial rinse before sliding it under your bridge. It delivers the medicine exactly where the bacteria hide. Give this ‘brush-dip’ method a shot tonight and see how much fresher your mouth feels in the morning.
Lessons from My First Year with Permanent Dental Work
Looking back, there are three things that fundamentally changed how I view my oral health. First, the snap isn’t the goal. With natural teeth, we listen for that snapping sound as floss passes the contact point, but with a bridge, you are aiming for a smooth, guided slide. Forcing a snap often leads to gum trauma. Second, I realized that your gums are the actual foundation. No matter how expensive the porcelain, if the gums recede due to neglect or over-brushing, the entire aesthetic is compromised. Finally, I stopped viewing cleaning as a chore and started seeing it as ‘smile insurance.’ Following family dentistry tips for a lifetime of healthy smiles isn’t just about avoiding the dentist’s chair; it is about protecting the confidence you worked so hard to gain.
My Daily Arsenal for a Pristine Smile
To keep everything from cutting-edge techniques in cosmetic dentistry to standard crowns in top shape, I rely on a specific kit. I use a high-end water flosser once a day to reach the deep sulcus where manual tools often fail. I also keep a stash of floss threaders in my car and my desk; being able to clean on the go prevents biofilm from hardening into tartar. Most importantly, I switched to a pH-neutral mouthwash to ensure I am not eroding the delicate bond of a veneers transformation. These tools aren’t just gadgets; they are the literal difference between a restoration that lasts five years and one that lasts a lifetime.
#IMAGE_PLACEHOLDER_E#
Protect the Investment You Made in Yourself
You didn’t go through the time and expense of getting high-quality dental work just to lose it to preventable plaque. Whether you are navigating the nuances of how dental implants reshape your oral health in 2025 or simply maintaining a single new crown, remember that you are the primary guardian of your smile. It gets easier every day as your muscle memory takes over. Stick with the routine, stay gentle with your technique, and keep that smile shining. Have you ever struggled with getting floss through a particularly tight dental bridge? Let me know in the comments below!